

本記事ではJavaScriptでフォームに入力した内容を受け取ります。
前回の記事で、HTMLを使って画面だけ作りましたが、今回はフォームに入力された情報をJavaScriptで取得してみます。
これまで学んだ様々なことを活用する必要があります。
JavaScriptで入力内容を受け取る
JavaScriptで入力内容を受け取る方法を解説します。
次の手順に従って解説していきますね。
- step1.各入力項目にidを設置する
- step2.会員登録ボタンが押されたときに動かす
- step3.各入力データを取得する
- step4.入力されていない場合にエラーを出す
step1.各入力項目にidを設置する
ます、JavaScriptでデータを識別できるよう、各入力項目にidをつける必要があります。
idをつける場合、inputタグにid属性を指定しましょう。
○コード例
<!DOCTYPE html> <head> <title>会員登録画面</title> </head> <body> <form method="post" action="test.html"> <p>名前</p> <input type="text" maxlength="100" placeholder="山田太郎" id="name"> <p>名前(ふりがな)</p> <input type="text" maxlength="200" placeholder="やまだたろう" id="name_huri"> <p>メールアドレス</p> <input type="text" maxlength="254" placeholder="aaaa@gmail.com" id="mail"> <p>パスワード</p> <input type="password" maxlength="20" placeholder="半角英数8文字以上" id="pass"> <p>パスワード再入力</p> <input type="password" maxlength="20" placeholder="半角英数8文字以上" id="repass"> <p>郵便番号</p> <input type="text" maxlength="7" placeholder="ハイフンなし" id="yuubin"> <p>住所</p> <input type="text" maxlength="200" id="address"> <p>電話番号</p> <input type="text" maxlength="21" placeholder="ハイフンなし" id="phone"> <p>生年月日</p> <input type="date" name="calendar" max="9999-12-31" id="birth"> <p><input type="submit" value="会員登録を行う" id="touroku"></p> </form> </body> </html> ○実行結果
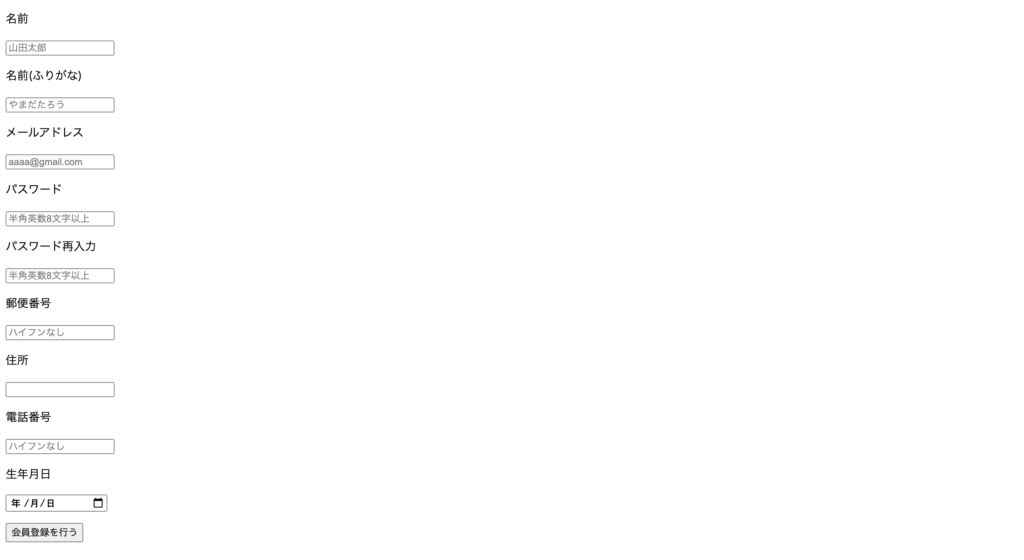
各入力欄にidを指定しました。
idはひと目で分かるものにすることが肝心です。
たとえば、名前を入力する欄は「name」というidにしています。
また、「パスワード」と「パスワード再入力」は入力内容は同じですが、idは違うものをつけてください。
更に入力欄だけでなく、会員登録ボタンにもidをつけています。
ボタンにもidをつけないと、会員登録ボタンが押されたタイミングでJavaScriptを動かすことができません。
step2.会員登録ボタンが押されたときに動かす
次に、会員登録ボタンが押されたときに、JavaScriptを動かすようにしてみます。
○コード例
<!DOCTYPE html> <head> <title>会員登録画面</title> </head> <body> <form method="post" action="test.html"> <p>名前</p> <input type="text" maxlength="100" placeholder="山田太郎" id="name"> <p>名前(ふりがな)</p> <input type="text" maxlength="200" placeholder="やまだたろう" id="name_huri"> <p>メールアドレス</p> <input type="text" maxlength="254" placeholder="aaaa@gmail.com" id="mail"> <p>パスワード</p> <input type="password" maxlength="20" placeholder="半角英数8文字以上" id="pass"> <p>パスワード再入力</p> <input type="password" maxlength="20" placeholder="半角英数8文字以上" id="repass"> <p>郵便番号</p> <input type="text" maxlength="7" placeholder="ハイフンなし" id="yuubin"> <p>住所</p> <input type="text" maxlength="200" id="address"> <p>電話番号</p> <input type="text" maxlength="21" placeholder="ハイフンなし" id="phone"> <p>生年月日</p> <input type="date" name="calendar" max="9999-12-31" id="birth"> <p><input type="submit" value="会員登録を行う" id="touroku"></p> </form> <script> document.getElementById("touroku").onclick = function() { document.write("会員登録ボタンが押されました。") }; </script> </body> </html> ○実行結果(会員登録ボタンを押した後)
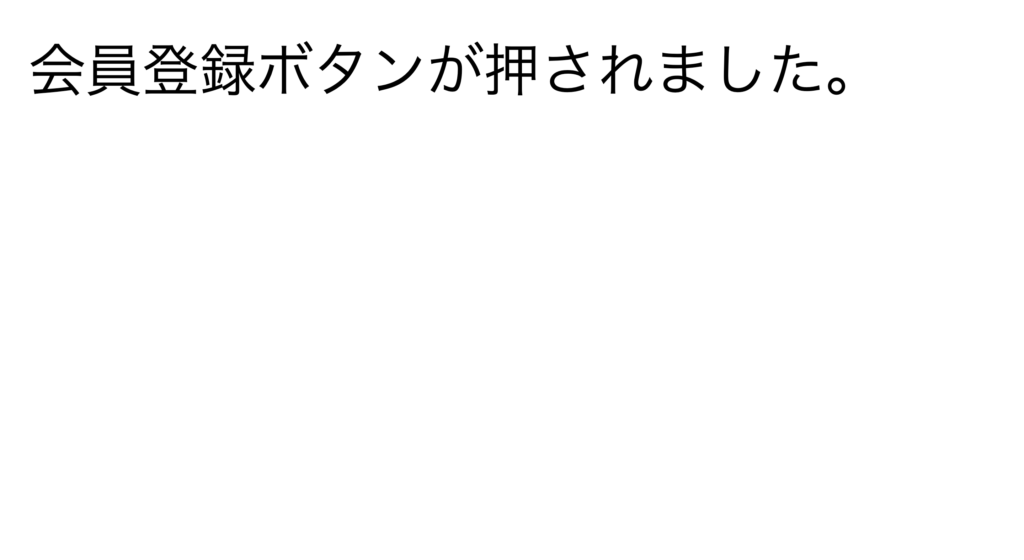
getElementByIdは指定したドキュメントにマッチする要素を取得するメソッドです。
onclickを使うことで、ボタンが押されたタイミングで処理を動かすことが可能です。
ボタンを押すと「会員登録ボタンが押されました。」と表示されれば、JavaScriptが正常に動いています。
onclickについて詳しく知りたい方は、【初級編8】JavaScriptのイベント処理の作り方を理解しよう、をお読みください。
step3.各入力データを取得する
続いて、各入力データを取得していきましょう。
データを取得する場合も、getElementByIdメソッドが活躍します。
○コード例
<!DOCTYPE html> <head> <title>会員登録画面</title> </head> <body> <form method="post" action="test.html"> <p>名前</p> <input type="text" maxlength="100" placeholder="山田太郎" id="name"> <p>名前(ふりがな)</p> <input type="text" maxlength="200" placeholder="やまだたろう" id="name_huri"> <p>メールアドレス</p> <input type="text" maxlength="254" placeholder="aaaa@gmail.com" id="mail"> <p>パスワード</p> <input type="password" maxlength="20" placeholder="半角英数8文字以上" id="pass"> <p>パスワード再入力</p> <input type="password" maxlength="20" placeholder="半角英数8文字以上" id="repass"> <p>郵便番号</p> <input type="text" maxlength="7" placeholder="ハイフンなし" id="yuubin"> <p>住所</p> <input type="text" maxlength="200" id="address"> <p>電話番号</p> <input type="text" maxlength="21" placeholder="ハイフンなし" id="phone"> <p>生年月日</p> <input type="date" name="calendar" max="9999-12-31" id="birth"> <p><input type="submit" value="会員登録を行う" id="touroku"></p> </form> <script> document.getElementById("touroku").onclick = function() { const name = document.getElementById("name").value; const name_huri = document.getElementById("name_huri").value; const mail = document.getElementById("mail").value; const pass = document.getElementById("pass").value; const repass = document.getElementById("repass").value; const yuubin = document.getElementById("yuubin").value; const address = document.getElementById("address").value; const phone = document.getElementById("phone").value; const birth = document.getElementById("birth").value; document.write(name); }; </script> </body> </html> ○実行結果(名前欄に「山田太郎」と入力)

getElementByIdによって指定したIDの要素を取り出します。
そして、valueプロパティを使うことで、フォームに入力した文字列のみを取得できます。
こうすることで、各入力データを取り出せました。
step4.入力されていない場合にエラーを出す
最後に、ユーザーがフォームに入力してないのにボタンを押した場合に、エラーを表示させる方法をみていきましょう。
○コード例
<!DOCTYPE html> <head> <title>会員登録画面</title> </head> <body> <form method="post" action="test.html"> <p>名前</p> <input type="text" maxlength="100" placeholder="山田太郎" id="name"> <p>名前(ふりがな)</p> <input type="text" maxlength="200" placeholder="やまだたろう" id="name_huri"> <p>メールアドレス</p> <input type="text" maxlength="254" placeholder="aaaa@gmail.com" id="mail"> <p>パスワード</p> <input type="password" maxlength="20" placeholder="半角英数8文字以上" id="pass"> <p>パスワード再入力</p> <input type="password" maxlength="20" placeholder="半角英数8文字以上" id="repass"> <p>郵便番号</p> <input type="text" maxlength="7" placeholder="ハイフンなし" id="yuubin"> <p>住所</p> <input type="text" maxlength="200" id="address"> <p>電話番号</p> <input type="text" maxlength="21" placeholder="ハイフンなし" id="phone"> <p>生年月日</p> <input type="date" name="calendar" max="9999-12-31" id="birth"> <p><input type="submit" value="会員登録を行う" id="touroku"></p> </form> <script> document.getElementById("touroku").onclick = function() { const name = document.getElementById("name").value; const name_huri = document.getElementById("name_huri").value; const mail = document.getElementById("mail").value; const pass = document.getElementById("pass").value; const repass = document.getElementById("repass").value; const yuubin = document.getElementById("yuubin").value; const address = document.getElementById("address").value; const phone = document.getElementById("phone").value; const birth = document.getElementById("birth").value; var flag = 0; if(name.length == 0){flag = 1;} if(name_huri.length == 0){ flag = 1; } if(mail.length == 0){ flag = 1; } if(pass.length == 0){ flag = 1; } if(repass.length == 0){ flag = 1; } if(flag == 1){ alert('必須項目が未記入の箇所があります'); } }; </script> </body> </html> ○実行結果(未記入の箇所があった場合のみ)
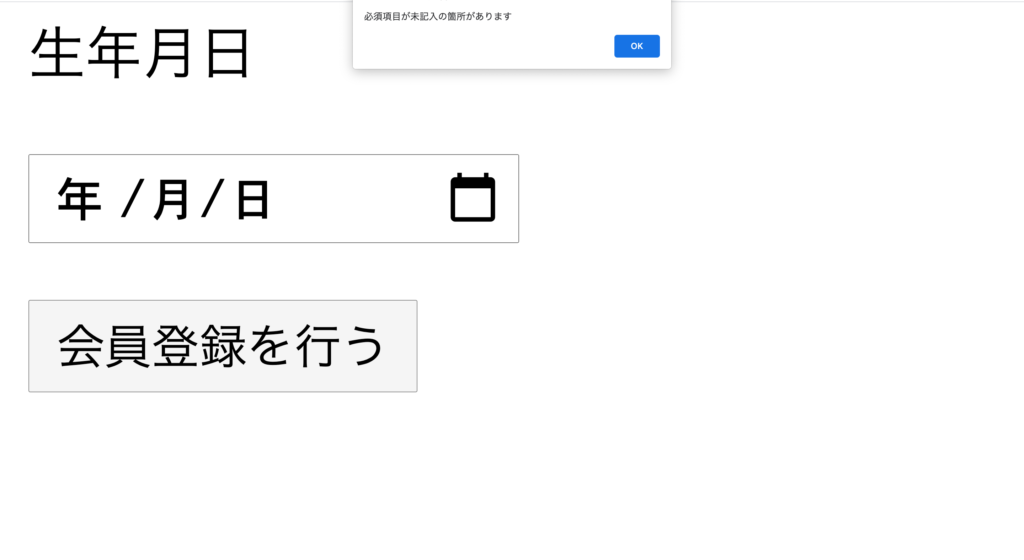
入力欄の中で、名前、メルアド、パスワードは必須項目です。
これらの項目が空欄だった場合に「必須項目が未記入の箇所があります」とアラートが出るようにしています。
空欄かどうかの判定は、lengthプロパティを使います。
lengthは文字列の長さを返すもので、「0」だった場合は空欄であるということです。
更にif文を使って、空欄があった場合に「flag」を「1」に指定しています。
こうすることで、flagが1だった場合のみ、アラートを表示させるようにしています。
まとめ
本記事では、JavaScriptで入力内容を取得する方法、を解説しました。
入力内容の取得はgetElementByIdを使うことで行なえます。
次回はJavaScriptで入力内容をチェックする方法、をみていきましょう。


コメント