

本記事では、今まで作ってきた会員登録画面の仕上げを行います。
前回の記事では、入力内容のチェックを行い、エラーがあった場合にアラートを表示させていました。
今回はエラー時にアラートではなく、エラー文を表示させるようにします。
実際の会員登録画面ではアラートではなく、エラー文を出すのが普通です。
JavaScriptとHTMLで会員登録画面を完成させる
JavaScriptとHTMLで会員登録画面を完成させましょう。
次のstepに従って解説していきます。
- step1.会員登録画面のデザインを整える
- step2.入力エラー文の表示をoffにしておく
- step3.入力エラー時に表示をonにする
- step4.会員登録完了画面に遷移させる
step1.会員登録画面のデザインを整える
まず、会員登録画面のデザインを整えておきましょう。
tableタグを使って、それぞれの入力フォームを横に表示するようにします。
○コード例
<form method="post" action="test.html"> <table width="1000"> <tr> <th>名前</th> <th><input type="text" maxlength="100" placeholder="山田太郎" id="name"> </tr> <tr> <th>名前(ふりがな)</th> <th><input type="text" maxlength="200" placeholder="やまだたろう" id="name_huri"></th> </tr> <tr> <th>メールアドレス</th> <th><input type="text" maxlength="254" placeholder="aaaa@gmail.com" id="mail"></th> </tr> <tr> <th>パスワード</th> <th><input type="password" maxlength="20" placeholder="半角英数8文字以上" id="pass"></th> </tr> <tr> <th>パスワード再入力</th> <th><input type="password" maxlength="20" placeholder="半角英数8文字以上" id="repass"></th> </tr> <tr> <th>郵便番号</th> <th><input type="text" maxlength="7" placeholder="ハイフンなし" id="yuubin"></th> </tr> <tr> <th>住所</th> <th><input type="text" maxlength="200" id="address"></th> </tr> <tr> <th>電話番号</th> <th><input type="text" maxlength="21" placeholder="ハイフンなし" id="phone"></th> </tr> <tr> <th>生年月日</th> <th><input type="date" name="calendar" max="9999-12-31" id="birth"></th> </tr> </table> <br/> <input type="submit" value="会員登録を行う" id="touroku"> </form> ○実行結果
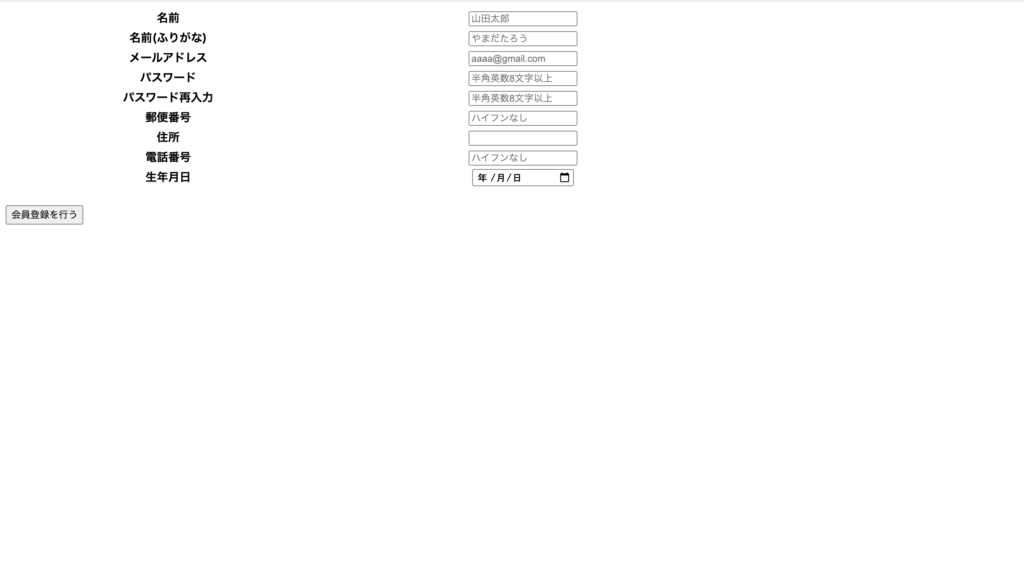
「名前 {入力欄}」などのように横に並ばせました。
入力欄の右側に、これからエラー時にエラー文を表示させるようにしていきます。
step2.入力エラー文の表示をoffにしておく
HTMLを変更して、エラー文を表示できるようにします。
会員登録ボタンが押されていない場合は、エラー文が表示されないようにしなくてはいけません。
style属性に「display: none」と指定することで、文字列を非表示にすることが可能です。
○コード例
<form method="post" action="test.html"> <table width="1000"> <tr> <th>名前</th> <th><input type="text" maxlength="100" placeholder="山田太郎" id="name"> <th id="name_chk" style="display: none; color: red;">名前が漢字になっていません</th> </tr> <tr> <th>名前(ふりがな)</th> <th><input type="text" maxlength="200" placeholder="やまだたろう" id="name_huri"></th> <th id="name_huri_chk" style="display: none; color: red;">名前(ふりがな)がひらがなになっていません</th> </tr> <tr> <th>メールアドレス</th> <th><input type="text" maxlength="254" placeholder="aaaa@gmail.com" id="mail"></th> <th id="mail_chk" style="display: none; color: red;">メールアドレスが形式に沿っていません</th> </tr> <tr> <th>パスワード</th> <th><input type="password" maxlength="20" placeholder="半角英数8文字以上" id="pass"></th> <th id="pass_chk" style="display: none; color: red;">パスワードが半角英数8文字以上になっていません</th> </tr> <tr> <th>パスワード再入力</th> <th><input type="password" maxlength="20" placeholder="半角英数8文字以上" id="repass"></th> <th id="repass_chk" style="display: none; color: red;">パスワードが最初と違っています</th> </tr> <tr> <th>郵便番号</th> <th><input type="text" maxlength="7" placeholder="ハイフンなし" id="yuubin"></th> <th id="yuubin_chk" style="display: none; color: red;">郵便番号が7桁になっていません</th> </tr> <tr> <th>住所</th> <th><input type="text" maxlength="200" id="address"></th> </tr> <tr> <th>電話番号</th> <th><input type="text" maxlength="21" placeholder="ハイフンなし" id="phone"></th> <th id="phone_chk" style="display: none; color: red;">電話番号が形式に沿っていません</th> </tr> <tr> <th>生年月日</th> <th><input type="date" name="calendar" max="9999-12-31" id="birth"></th> </tr> </table> <br/> <input type="submit" value="会員登録を行う" id="touroku"> </form> ○実行結果

実行結果を見て分かる通り、HTMLが書かれているにも関わらず、何も表示されていません。
「display: none」を指定した効果です。
エラーがある場合は、JavaScriptによって「display: none」を「display: block」に変更します。
こうすることで、エラー時のみに文字列を表示できるのです。
step3.入力エラー時に表示をonにする
それではJavaScriptを使って、入力エラー時にエラー文を表示させましょう。
○コード例
<script> document.getElementById("touroku").onclick = function() { const name = document.getElementById("name").value; const name_huri = document.getElementById("name_huri").value; const mail = document.getElementById("mail").value; const pass = document.getElementById("pass").value; const repass = document.getElementById("repass").value; const yuubin = document.getElementById("yuubin").value; const address = document.getElementById("address").value; const phone = document.getElementById("phone").value; const birth = document.getElementById("birth").value; var flag = 0; if(name.length == 0){flag = 1;} if(name_huri.length == 0){ flag = 1; } if(mail.length == 0){ flag = 1; } if(pass.length == 0){ flag = 1; } if(repass.length == 0){ flag = 1; } if(flag == 1){ alert('必須項目が未記入の箇所があります'); return false; } else{ flag_chk = 0; var regexp = /[一-龠]/; if(regexp.test(name) != true){ document.getElementById('name_chk').style.display = "block"; flag_chk = 1; } else{ document.getElementById('name_chk').style.display = "none"; } var regexp = /^[\u{3000}-\u{301C}\u{3041}-\u{3093}\u{309B}-\u{309E}]+$/mu; if(regexp.test(name_huri) != true){ document.getElementById('name_huri_chk').style.display = "block"; flag_chk = 1; } else{ document.getElementById('name_huri_chk').style.display = "none"; } var regexp = /^[A-Za-z0-9]{1}[A-Za-z0-9_.-]*@{1}[A-Za-z0-9_.-]{1,}\.[A-Za-z0-9]{1,}$/; if(regexp.test(mail) != true){ document.getElementById('mail_chk').style.display = "block"; flag_chk = 1; } else{ document.getElementById('mail_chk').style.display = "none"; } var regexp = /^([a-zA-Z0-9]{8,})$/; if(regexp.test(pass) != true){ document.getElementById('pass_chk').style.display = "block"; flag_chk = 1; } else{ document.getElementById('pass_chk').style.display = "none"; } if(pass != repass){ document.getElementById('repass_chk').style.display = "block"; flag_chk = 1; } else{ document.getElementById('repass_chk').style.display = "none"; } var regexp = /^\d{7}$/; if(regexp.test(yuubin) != true){ document.getElementById('yuubin_chk').style.display = "block"; flag_chk = 1; } else{ document.getElementById('yuubin_chk').style.display = "none"; } var regexp = /^(0{1}\d{9,10})$/; if(regexp.test(phone) != true){ document.getElementById('phone_chk').style.display = "block"; flag_chk = 1; } else{ document.getElementById('phone_chk').style.display = "none"; } if(flag_chk == 1){ return false; } else{ return ture; } } }; </script> ○実行結果
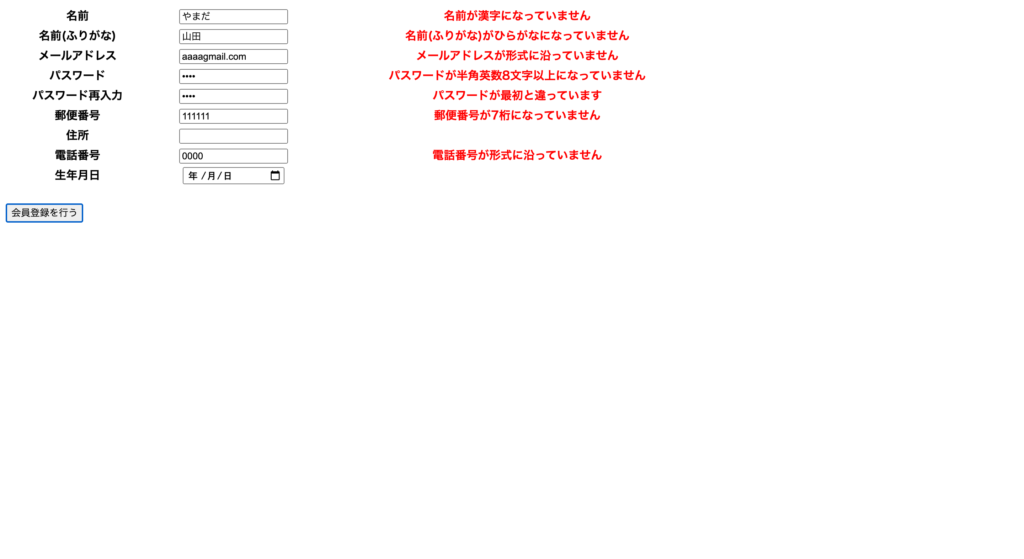
各入力内容のチェックでエラーが発覚した場合、「display: none」を「display: block」に変更しています。
getElementByIdを使って変更箇所のIDを指定する必要があります。
エラーではない場合は、「display: none」を指定し、エラー文が出ない状態にします。
これで、エラー時にアラートではなく、エラー文を表示させることができました。
step4.会員登録完了画面に遷移させる
最後に、エラーが発生しなかった場合に、会員登録画面に遷移させる処理を行いましょう。
HTMLのformタグのaction属性には現在「test.html」が指定されています。
ここを別のURLにすることで、会員登録ボタンを押したときに別画面に移動させられます。
○コード例
<form method="post" action="test2.html"> 今回は会員登録完了画面を「test2.html」としaction属性に指定しました。
これで会員登録ボタンを押したら、会員登録完了画面に移動できるようになりました。
このように、action属性にURLを指定することで、指定の画面に移動できます。
以上が、JavaScriptとHTMLを使っての会員登録画面の作り方です。
まとめ
本記事では、会員登録画面の仕上げを行いました。
getElementByIdを上手く使うことで、エラー文を表示させることが可能です。
これで会員登録画面の作り方は一通り説明が完了しました。
なお、実際の開発では、サーバー側でデータベースにアクセスし、登録済みのユーザーではないか、不正ユーザーではないか、などチェックをする必要があります。
サーバー側の処理は、PHPやPythonを使うことになります。
こちらの言語も勉強しておくと、Webサイト開発において幅広い分野に対応ができるでしょう。


コメント